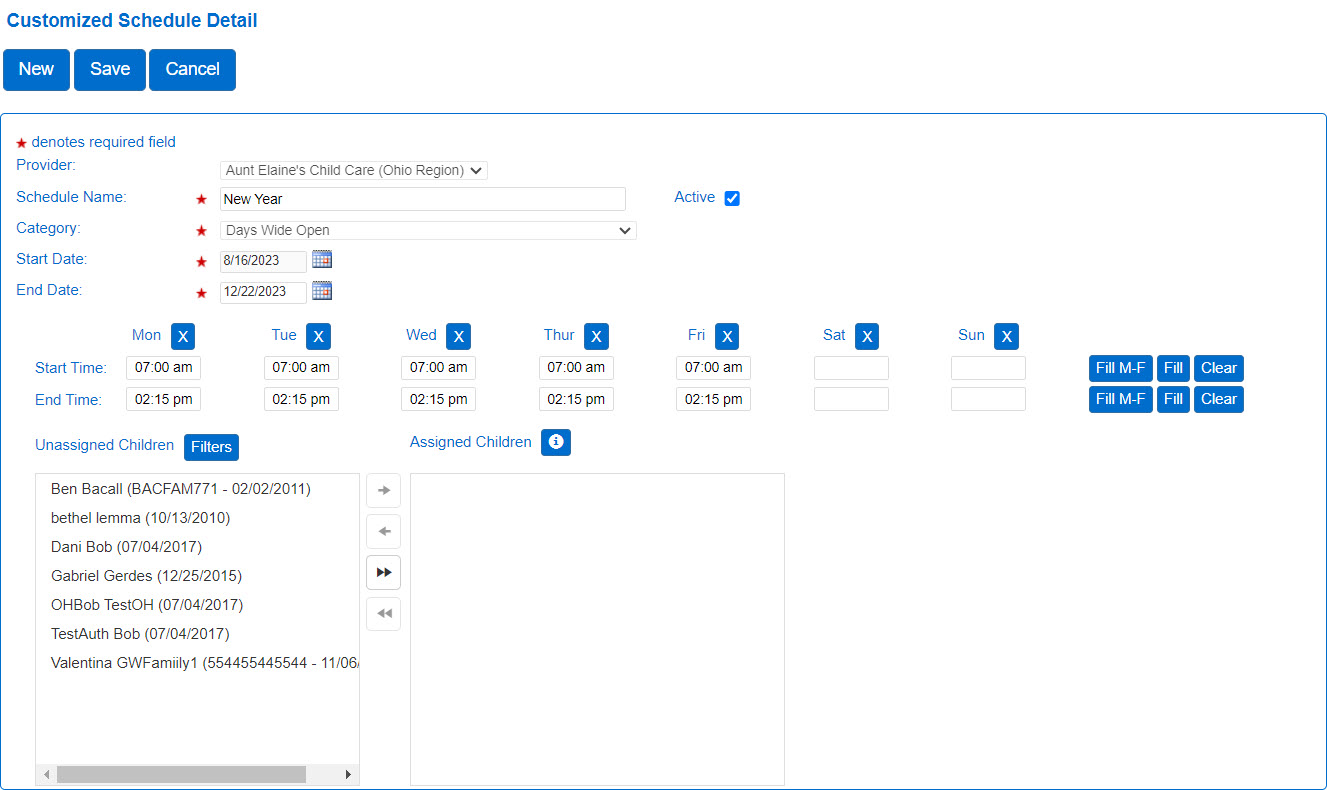
Use the Customized Schedule > Detail page to view or edit the details of the selected customized schedule. Use this activity also to create and delete customized schedules. All modifications to a customized schedule are tracked in the History.
| Field | Description |
|---|---|
| Provider | Displays the name of the selected Provider and allows you to clear and search for a different Provider. |
| Schedule Name |
Displays the name of the schedule. |
| Active |
If checked, the schedule will only show when it is active. If unchecked, the schedule will show even if is no longer active. The selection of Active determines if the schedule is used in payment calculations. |
| Category |
Displays the category assigned to the schedule. |
| Start Date | Displays the start date of the schedule. |
| End Date | Displays the end date of the schedule. |
| Start Time | Displays the beginning time of the schedule. |
| End Time | Displays the end time of the schedule. |
|
|
Use this button next to the day of the week to clear the times entered for the selected day. |

|
Use this button to populate the Start and End times across Monday, Tuesday, Wednesday, Thursday and Friday if those days have the same Start and End times. Note: The button is disabled if there are no times entered for Monday. |

|
Use this button to populate the Start and End hours across all the days of the week, including Saturday and Sunday, if those days have the same Start and End Times. Note: The button is disabled if there are no times entered for Monday. |
|
|
Use this button to remove the hours for all days in the week. |
| Unassigned Children | Lists all children associated with the Provider who are not currently assigned to the schedule. The child's Case Number and Date of Birth appear in parenthesis next to the name. |
| Filters |
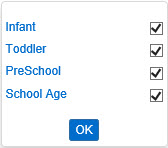
Click to select the filters available for the children. Check the appropriate checkboxes to filter the unassigned children to those that match the checked age groups. Note: If no filter is selected, the results will include all children.
|
| Assigned Children | Lists all children associated with the Provider who are currently assigned to the schedule. The child's Case Number and Date of Birth appear in parenthesis next to the name. The payments for these children will be affected based on the times entered. |

|
Use this button to review additional information about the assigned children list. |

|
Use this button to assign the selected children to the schedule. |

|
Use this button to unassign the selected children from the schedule. |

|
Use this button to assign all children in the list to the schedule. |

|
Use this button to unassign all children in the list from the schedule. |
 next to the Provider selector if you would like to clear the selection and re-enter the desired search parameters. For additional information on searching for a Provider, refer to Customized Schedule > Search.
 Enter the Start Time and End Time for the Customized Schedule.
Notes: When submitting attendance for the months October through April for school-age children, a customized school schedule must cover the entire attendance period being submitted. When submitting attendance periods for the month of September, the child is only required to have a customized school schedule that includes September 30th. When submitting attendance periods for the month of May, the child is only required to have a customized school schedule that includes May 1st. If the dates and times entered do not meet the Category requirements, KinderConnect generates an error message and the record will not be saved.

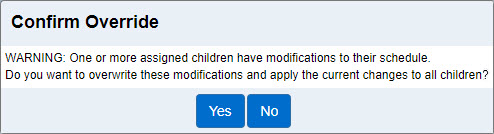
Note: When editing a Customized Schedule, if it has been previously modified at the Child Level, KinderConnect issues a Confirm Override warning message prompting the user to confirm if the previously made child level modifications should be replaced with the modifications now being made to the Customized Schedule.

Note: If a Payment has been made using this Customized Schedule, the Delete button will not be available.
To view the history of all changes made to a Customized Schedule: